So perhaps one of my biggest hurdles, thus far, with creating my blog site has been figuring out how on earth to create tabs on the top of my page. As anyone in Blogger knows, you get the main page that lists every single post you've ever written, but I wanted something more than a list of posts. Something where people could click on a specific topic and read about what they wanted, rather than having to filter through and weed out.
Turns out there are more than a few different ways to go about creating tabs in Blogger, but I found the most informative source of options to be at www.blogger-hints-and-tips.blogspot.com/2010/12/how-to-put-put-posts-into-your-pages-in.html?m=1
This blogger definitely knows what they're talking about...and I definitely don't, so there was a lot of looking up of stuff up in order to understand some of the basic blogging lingo. If you're at all like me, just be prepared with your favorite search engine nearby! You'll be glad you did!
So if you're at this website now, you'll notice three options for creating tabs are listed. I actually tested the look for each of them before I settled in.
Here's what worked for me:
-Creating a tab using the Labels Gadget. I found this to be the easiest to set up, by far!
Here's the play-by-play:
1. Go to the Blogger page that lists all your Posts.

2. On the Menu Bar on the left-hand side, click on "Pages":
In here, you just want to make sure that the only page listed is your Home page. If there are others, go ahead and delete them. Note that the "Home" button cannot be deleted.
Either now or later, you have the option of renaming your "Home" page to read whatever you like. The way I set up my blog, I have labeled this "The Feed". For me it was a good solution. You can't delete this page, like I had originally wanted, so I just made the most of it and wound up loving it! If anyone is looking for your entire run of posts, they can just click here to see them all. I renamed it because, for the look I was going for, a run of all my posts didn't fit my idea of what a Home Page tends to be.
When done here, make sure to click "Save Arrangement".
3. Going back to the Menu Bar, click on "Layout":
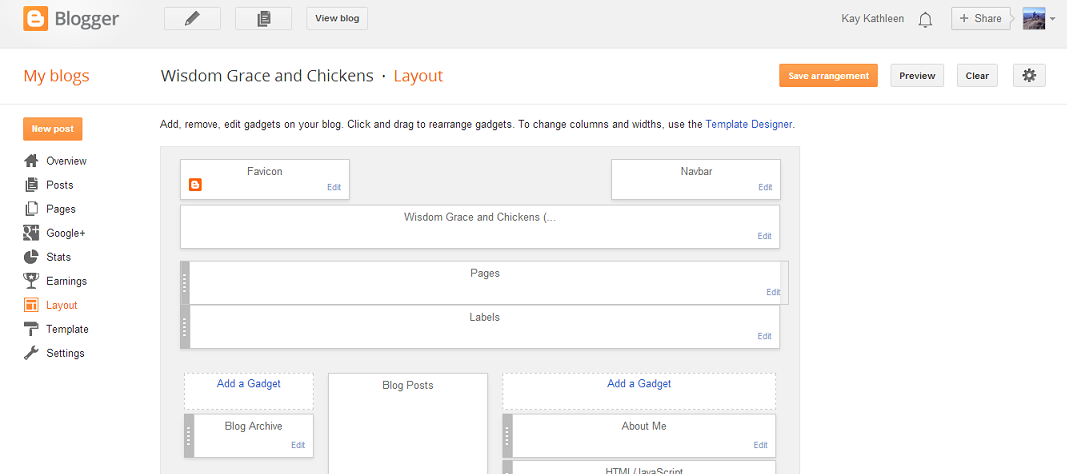
As you can see, I chose a template that allotted for adding Gadgets above my blog posts.
Underneath "Pages", you should have an "Add a Gadget" box (mine has already been changed to Labels, don't let that throw you off!).
Go ahead and click on "Add a Gadget".
From here you will see a box like this:

Scroll down and click the + Sign next to the "Labels" option.
This will take you to the next screen:

What you see here are the settings that I chose for my blog. You'll probably need to go back and forth on this a few times, testing out what each setting does and then viewing it on your blog to see if this is "the one". Note, though, that you'll have to make one more adjustment before you will see these settings come to life on your site. See next step.
Here's what worked for me:
-Creating a tab using the Labels Gadget. I found this to be the easiest to set up, by far!
Here's the play-by-play:
1. Go to the Blogger page that lists all your Posts.
2. On the Menu Bar on the left-hand side, click on "Pages":
In here, you just want to make sure that the only page listed is your Home page. If there are others, go ahead and delete them. Note that the "Home" button cannot be deleted.
Either now or later, you have the option of renaming your "Home" page to read whatever you like. The way I set up my blog, I have labeled this "The Feed". For me it was a good solution. You can't delete this page, like I had originally wanted, so I just made the most of it and wound up loving it! If anyone is looking for your entire run of posts, they can just click here to see them all. I renamed it because, for the look I was going for, a run of all my posts didn't fit my idea of what a Home Page tends to be.
When done here, make sure to click "Save Arrangement".
3. Going back to the Menu Bar, click on "Layout":
As you can see, I chose a template that allotted for adding Gadgets above my blog posts.
Underneath "Pages", you should have an "Add a Gadget" box (mine has already been changed to Labels, don't let that throw you off!).
Go ahead and click on "Add a Gadget".
From here you will see a box like this:
Scroll down and click the + Sign next to the "Labels" option.
This will take you to the next screen:
What you see here are the settings that I chose for my blog. You'll probably need to go back and forth on this a few times, testing out what each setting does and then viewing it on your blog to see if this is "the one". Note, though, that you'll have to make one more adjustment before you will see these settings come to life on your site. See next step.
Take note of the "Show" setting here. I currently have it set to show all labels, but as I add more labels, I'll be needing to change that. If you have several labels assigned to your post (s) already, you'll likely want to click on "Selected Labels" instead. This will allow you to only show the ones you're looking to show Tabs for on your site.
4. The final step...
If you've got an existing post, go ahead and click on "Edit"...if this is your first post, click on "New Post".
On the next screen, look to the bar on the right and find "Labels". Inside this little box holds the future to a beautiful menu/tab bar for your blog! It is here that you'll put whatever you would like for your Tab to read. This current post I will want to put under my "Blog Smarts" tab, so that's the label I'll insert here. *NOTE: if you already have labels in here, you will need to clear them out, click "Done", "Save", then go back in and add your label.
Keep in mind that you can still put more than one label in here, if you choose. If one of the labels is not one that you want to have appearing as a tab, you would just indicate so by following the instructions up above in step three. I will also be putting a "Blog Help" label on this post, but will adjust my settings to have it only appear under "Blog Smarts"...
Click "Save" & "Publish"/"Update" if you are editing an existing post.
CONGRATULATIONS!! You did it! I hate to say after these long winded steps that that's pretty much it, but it is. After having spent hours lost in blog set-up confusion myself, I DO hope that this post has been a source of relief for someone out there!! Figuring this stuff out is a process, but I gotta admit that I'm loving it!
Let me know if this has helped you at all (OR furthered your confusion)...I'd appreciate the feedback! Also, if you have questions, ask away! I will either have a well-researched answer or be able to point you towards a source that does!!
Got your blog all set up? Toss me a link, and let me see what you've created!!

No comments:
Post a Comment